

이메일 50통, AI한테 시켰다
커스텀굿즈 주문 확인, 1688 소싱 알림, HealthNote 사용자 문의, Choviet 댓글 알림.
프로젝트를 하나씩 만들 때마다 이메일이 하나씩 늘었다. 어느 날 보니 하루에 50통이 넘고 있었다. 하나하나 라벨 붙이고, 분류하고, 읽고. 그러다 문득 생각했다.
“이것도 AI한테 시키면 되잖아.”
된다. 오늘 만든다.
이 글에서 만드는 것
Claude Code에서 이런 대화가 가능해진다:
나: "오늘 온 1688 관련 이메일 보여줘"
Claude: [Gmail에서 검색해서 목록 표시]

나: "이거 전부 '소싱' 라벨 붙여줘"
Claude: [3개 이메일에 '소싱' 라벨 적용 완료]

나: "앞으로 1688에서 오는 건 자동으로 소싱 라벨"
Claude: [Gmail 필터 생성 완료]
소요 시간: 약 1시간
난이도: 중급 (터미널 기본 사용 가능하면 OK)
필요한 것: Google 계정, Node.js, Claude Code
목차
- 전체 구조 이해하기
- Google Cloud Console 설정
- 프로젝트 초기화
- OAuth 인증 구현
- Gmail 도구 구현
- MCP 서버 완성
- Claude Code 연동
- 실전 사용 예시
- 트러블슈팅
1. 전체 구조 이해하기
MCP(Model Context Protocol)란?
MCP는 AI 모델이 외부 도구를 사용할 수 있게 해주는 프로토콜이다.
┌─────────────┐     ┌─────────────┐     ┌─────────────┐
│ Claude Code │ ←→  │ MCP Server  │ ←→  │  Gmail API  │
│  (AI 대화)   │     │ (우리가 만듦) │     │  (Google)   │
└─────────────┘     └─────────────┘     └─────────────┘
우리가 만들 gmail-agent-mcp는 중간 다리 역할이다:
– Claude가 “이메일 검색해줘”라고 요청하면
– MCP 서버가 Gmail API를 호출하고
– 결과를 Claude에게 돌려준다
프로젝트 구조
gmail-agent-mcp/
├── package.json
├── tsconfig.json
├── credentials.json      # Google OAuth 인증 정보 (비밀!)
├── token.json           # 인증 토큰 (자동 생성)
└── src/
    ├── index.ts         # MCP 서버 메인
    ├── auth.ts          # Google OAuth 인증
    └── tools/
        ├── list_emails.ts
        ├── read_email.ts
        ├── search_emails.ts
        ├── apply_label.ts
        └── create_filter.ts
2. Google Cloud Console 설정
이 단계가 가장 복잡하다. 천천히 따라오자.
Step 2-1: Google Cloud Console 접속
- console.cloud.google.com 접속
- Google 계정으로 로그인
Step 2-2: 새 프로젝트 생성
- 상단의 프로젝트 선택 드롭다운 클릭
- “새 프로젝트” 클릭
- 프로젝트 이름 입력:
gmail-agent - “만들기” 클릭
- 생성 완료까지 30초 정도 대기
프로젝트가 생성되면 대시보드에서 프로젝트 정보를 확인할 수 있다:
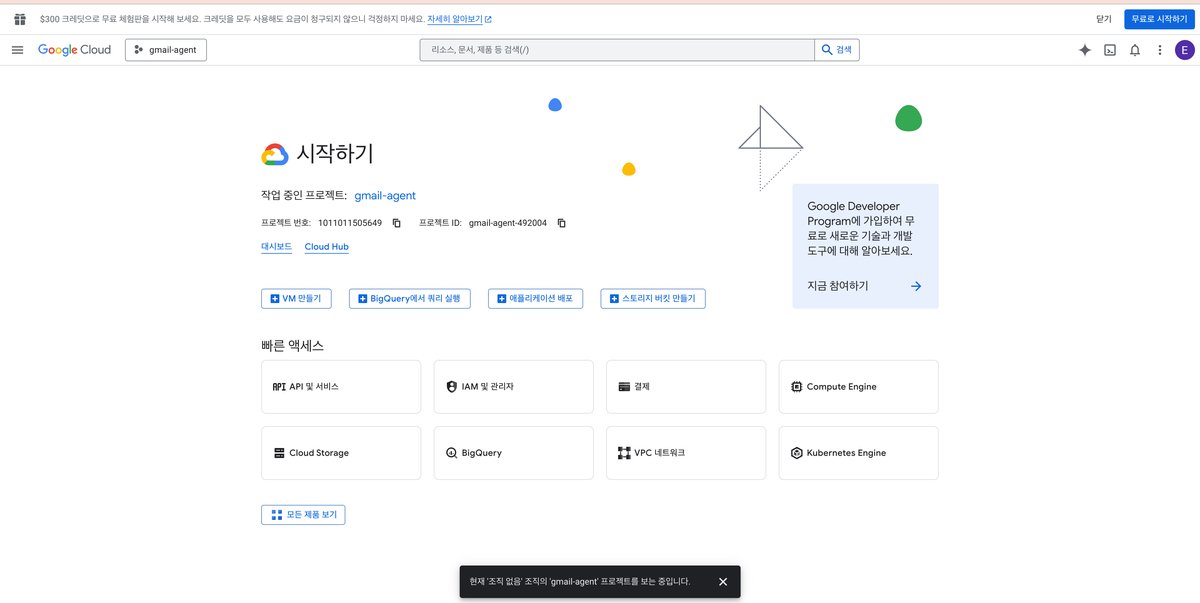
💡 Tip: 프로젝트 이름을 “My First Project” 같은 기본 이름 대신
gmail-agent처럼 알아보기 쉬운 이름으로 지정하면 나중에 프로젝트가 많아져도 관리하기 편하다.
Step 2-3: Gmail API 활성화
- 빠른 액세스에서 “API 및 서비스” 클릭
- 상단 “+ API 및 서비스 사용 설정” 클릭
- 검색창에
Gmail API입력 - Gmail API 클릭
- “사용” 버튼 클릭
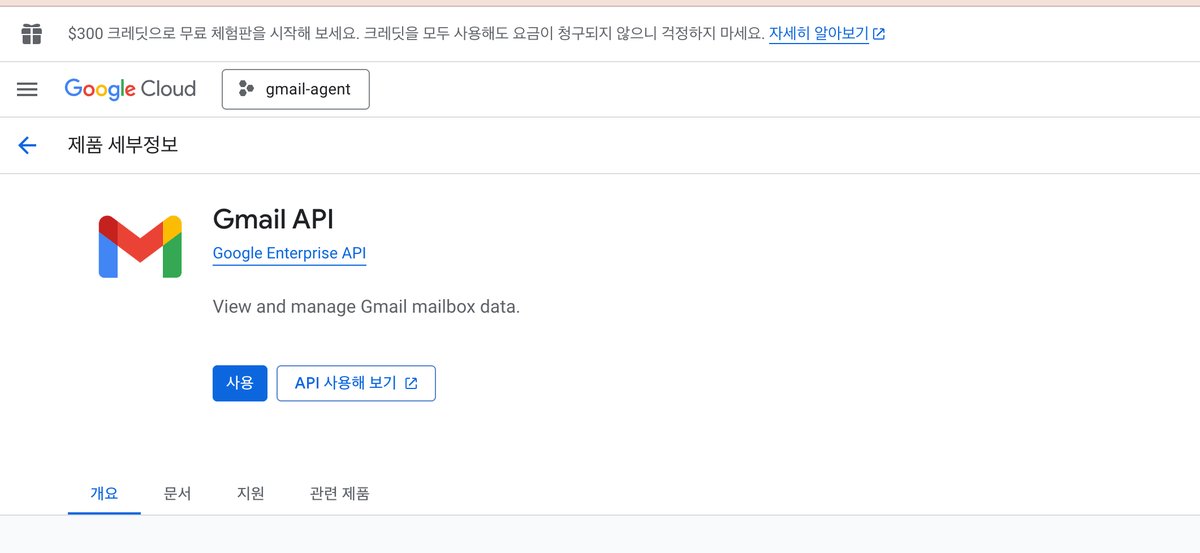
✅ Gmail API 활성화 완료
Step 2-4: OAuth 동의 화면 설정
- 좌측 메뉴 “API 및 서비스” > “OAuth 동의 화면”
- User Type: “외부” 선택 > “만들기”
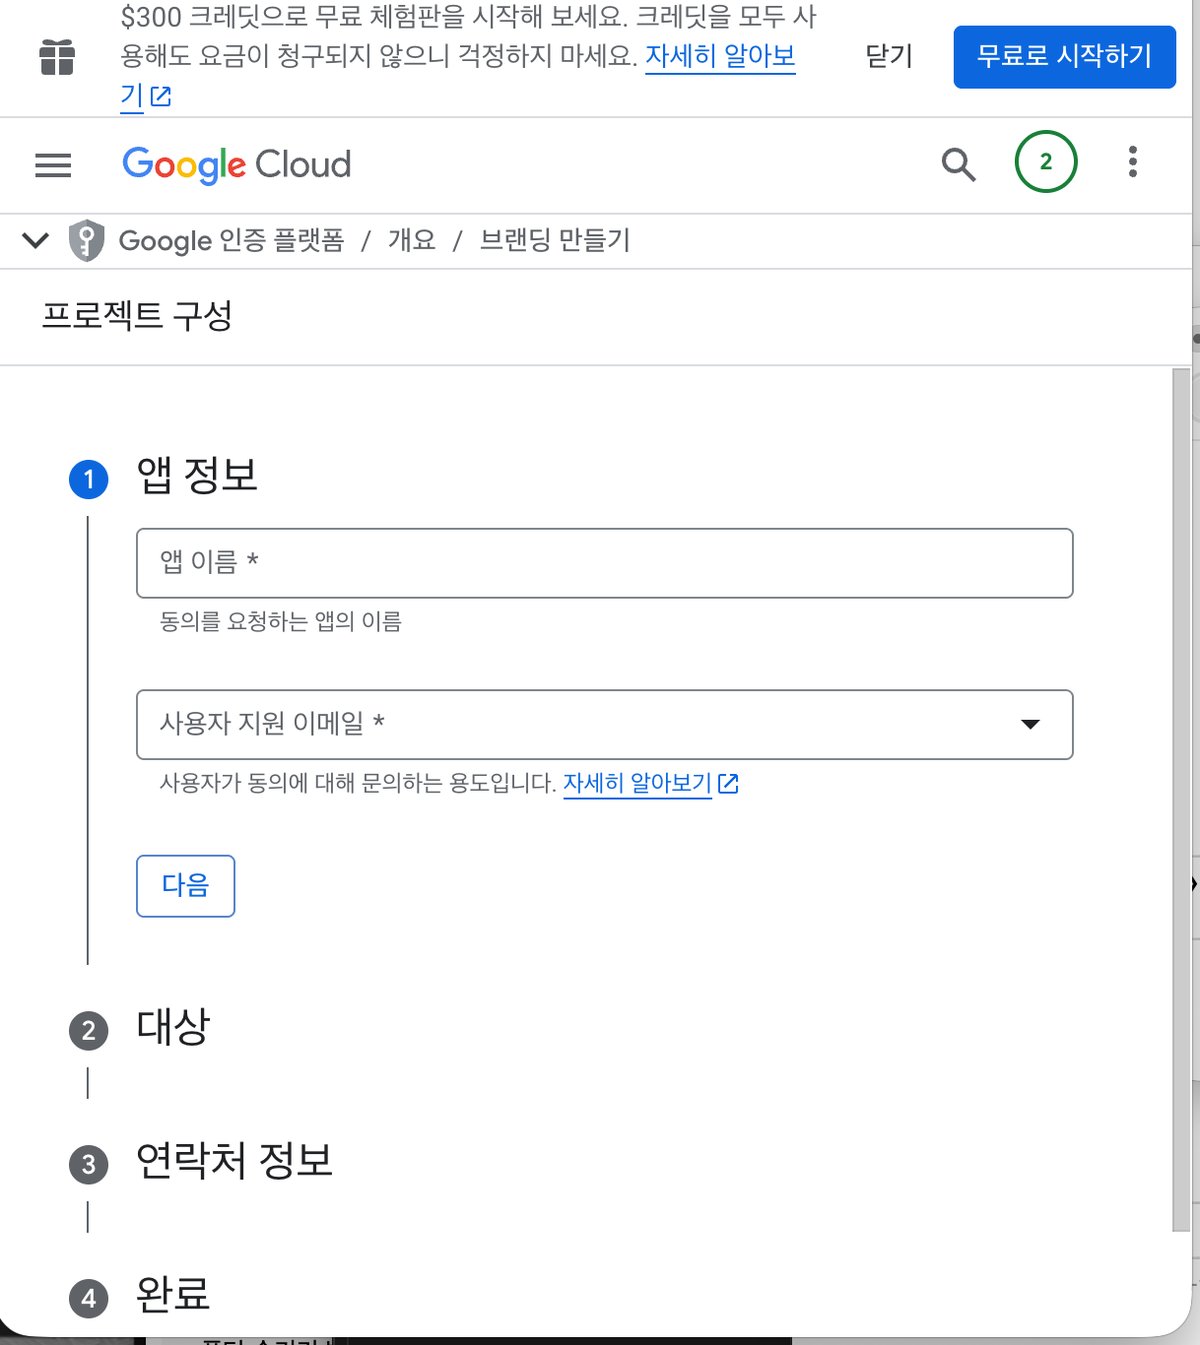
- 필수 정보 입력:
- 앱 이름:
Gmail Agent - 사용자 지원 이메일: 본인 이메일
- 개발자 연락처: 본인 이메일
- “저장 후 계속”
- 범위(Scopes) 설정 – “범위 추가 또는 삭제” 클릭:
| 범위 | 설명 |
|---|---|
https://www.googleapis.com/auth/gmail.readonly |
이메일 읽기 |
https://www.googleapis.com/auth/gmail.modify |
이메일 수정 (라벨, 아카이브) |
https://www.googleapis.com/auth/gmail.labels |
라벨 관리 |
- “저장 후 계속”
- 테스트 사용자 추가: 본인 Gmail 주소 입력
- “저장 후 계속”
Step 2-5: OAuth 클라이언트 ID 생성
- 좌측 메뉴 “API 및 서비스” > “사용자 인증 정보”
- 상단 “+ 사용자 인증 정보 만들기” > “OAuth 클라이언트 ID”
- 애플리케이션 유형: “데스크톱 앱”
- 이름:
Gmail Agent Desktop - “만들기” 클릭
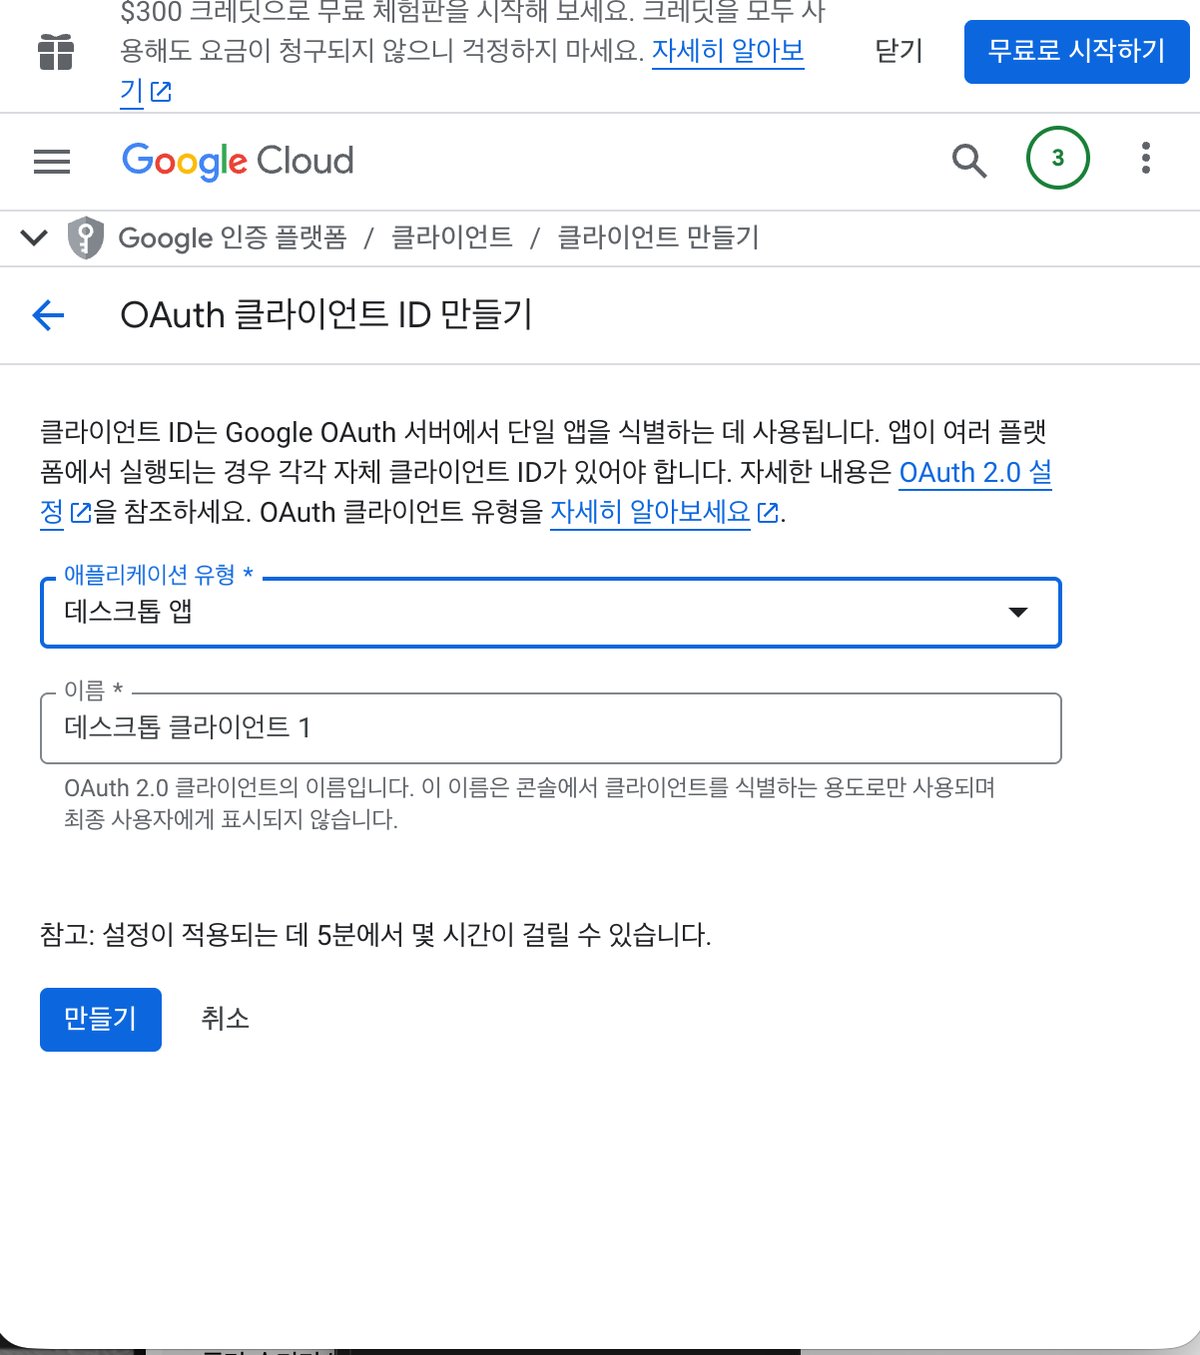
- “JSON 다운로드” 클릭 →
credentials.json저장
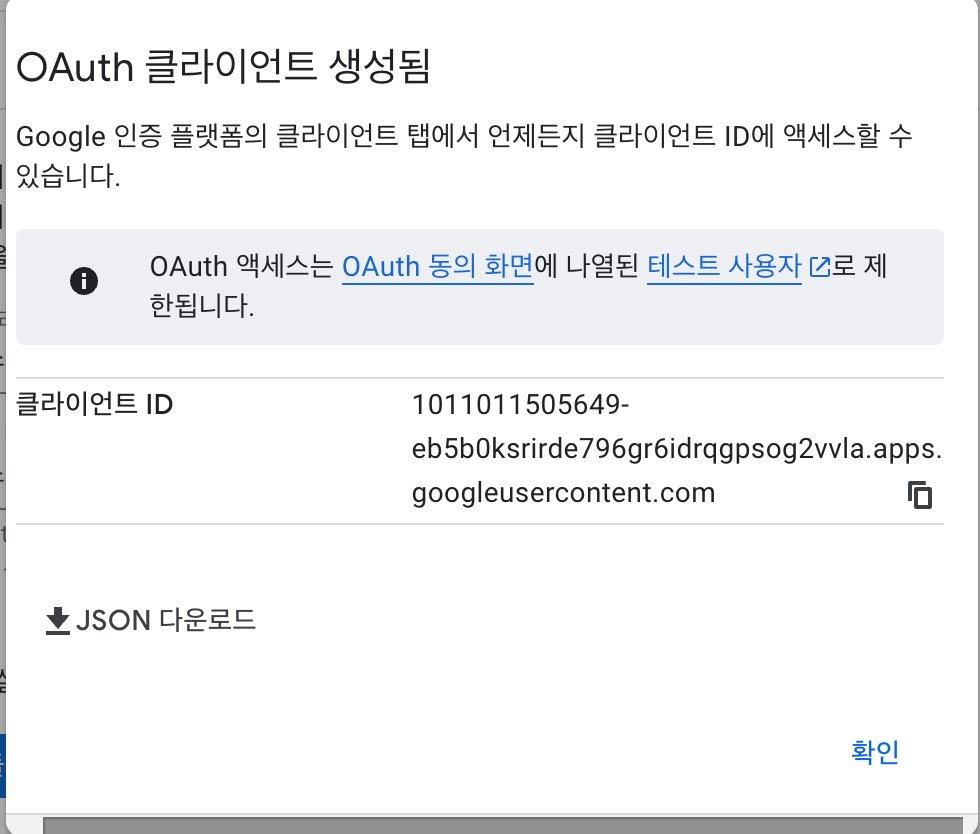
⚠️ 중요: credentials.json은 절대 공개 저장소에 올리지 마세요!
3. 프로젝트 초기화
Step 3-1: 프로젝트 폴더 생성
# 프로젝트 폴더 생성
mkdir gmail-agent-mcp
cd gmail-agent-mcp

# npm 초기화
npm init -y
Step 3-2: 의존성 설치
# 필수 패키지 설치
npm install @modelcontextprotocol/sdk googleapis

# 개발 의존성
npm install -D typescript @types/node ts-node
Step 3-3: TypeScript 설정
# tsconfig.json 생성
npx tsc --init
tsconfig.json 수정:
{
  "compilerOptions": {
    "target": "ES2020",
    "module": "commonjs",
    "lib": ["ES2020"],
    "outDir": "./dist",
    "rootDir": "./src",
    "strict": true,
    "esModuleInterop": true,
    "skipLibCheck": true,
    "resolveJsonModule": true
  },
  "include": ["src/**/*"],
  "exclude": ["node_modules"]
}
Step 3-4: credentials.json 복사
# 다운로드한 credentials.json을 프로젝트 폴더로 이동
mv ~/Downloads/client_secret_*.json ./credentials.json
Step 3-5: .gitignore 설정
# .gitignore 생성
cat > .gitignore << 'EOF'
node_modules/
dist/
credentials.json
token.json
*.log
EOF
⚠️ credentials.json과 token.json은 반드시 .gitignore에 포함!
4. OAuth 인증 구현
Gmail API에 접근하려면 먼저 사용자 인증이 필요하다.
Step 4-1: auth.ts 작성
src/auth.ts 파일 생성:
// src/auth.ts
// Gmail API OAuth 인증 모듈

import { google } from 'googleapis';
import { OAuth2Client } from 'google-auth-library';
import * as fs from 'fs';
import * as path from 'path';
import * as http from 'http';
import { URL } from 'url';

// 인증 범위 - Gmail 읽기, 수정, 라벨 관리
const SCOPES = [
  'https://www.googleapis.com/auth/gmail.readonly',
  'https://www.googleapis.com/auth/gmail.modify',
  'https://www.googleapis.com/auth/gmail.labels',
];

// 파일 경로
const CREDENTIALS_PATH = path.join(process.cwd(), 'credentials.json');
const TOKEN_PATH = path.join(process.cwd(), 'token.json');

/**
 * 저장된 토큰이 있으면 로드
 */
function loadSavedToken(): any | null {
  try {
    if (fs.existsSync(TOKEN_PATH)) {
      const content = fs.readFileSync(TOKEN_PATH, 'utf-8');
      return JSON.parse(content);
    }
  } catch (err) {
    console.error('토큰 로드 실패:', err);
  }
  return null;
}

/**
 * 토큰 저장
 */
function saveToken(token: any): void {
  fs.writeFileSync(TOKEN_PATH, JSON.stringify(token, null, 2));
  console.log('토큰 저장 완료:', TOKEN_PATH);
}

/**
 * 브라우저 인증 후 로컬 서버로 콜백 받기
 */
async function getNewToken(oauth2Client: OAuth2Client): Promise<void> {
  return new Promise((resolve, reject) => {
    // 인증 URL 생성
    const authUrl = oauth2Client.generateAuthUrl({
      access_type: 'offline',
      scope: SCOPES,
    });

    console.log('n=== Gmail 인증 필요 ===');
    console.log('아래 URL을 브라우저에서 열어주세요:n');
    console.log(authUrl);
    console.log('n인증 완료를 기다리는 중...n');

    // 로컬 서버로 콜백 받기
    const server = http.createServer(async (req, res) => {
      try {
        const url = new URL(req.url!, `http://localhost:3000`);
        const code = url.searchParams.get('code');

        if (code) {
          // 인증 코드로 토큰 교환
          const { tokens } = await oauth2Client.getToken(code);
          oauth2Client.setCredentials(tokens);
          saveToken(tokens);

          res.writeHead(200, { 'Content-Type': 'text/html; charset=utf-8' });
          res.end('<h1>인증 완료!</h1><p>이 창을 닫아도 됩니다.</p>');

          server.close();
          resolve();
        }
      } catch (err) {
        reject(err);
      }
    });

    server.listen(3000, () => {
      console.log('콜백 서버 대기 중: http://localhost:3000');
    });
  });
}

/**
 * 인증된 OAuth2 클라이언트 반환
 */
export async function getAuthenticatedClient(): Promise<OAuth2Client> {
  // credentials.json 로드
  if (!fs.existsSync(CREDENTIALS_PATH)) {
    throw new Error(
      'credentials.json 파일이 없습니다.n' +
      'Google Cloud Console에서 OAuth 클라이언트 ID를 생성하고 다운로드하세요.'
    );
  }

  const credentials = JSON.parse(fs.readFileSync(CREDENTIALS_PATH, 'utf-8'));
  const { client_id, client_secret, redirect_uris } = credentials.installed || credentials.web;

  // OAuth2 클라이언트 생성
  const oauth2Client = new google.auth.OAuth2(
    client_id,
    client_secret,
    'http://localhost:3000'  // 로컬 콜백 URL
  );

  // 저장된 토큰 확인
  const savedToken = loadSavedToken();
  if (savedToken) {
    oauth2Client.setCredentials(savedToken);
    console.log('저장된 토큰으로 인증 완료');
    return oauth2Client;
  }

  // 새 토큰 발급
  await getNewToken(oauth2Client);
  return oauth2Client;
}

/**
 * Gmail API 클라이언트 반환
 */
export async function getGmailClient() {
  const auth = await getAuthenticatedClient();
  return google.gmail({ version: 'v1', auth });
}
Step 4-2: 인증 테스트
테스트 파일 생성 src/test-auth.ts:
// src/test-auth.ts
import { getGmailClient } from './auth';

async function testAuth() {
  console.log('Gmail 인증 테스트 시작...n');

  const gmail = await getGmailClient();

  // 프로필 조회로 연결 확인
  const profile = await gmail.users.getProfile({ userId: 'me' });

  console.log('✅ 인증 성공!');
  console.log('이메일:', profile.data.emailAddress);
  console.log('총 메시지 수:', profile.data.messagesTotal);
}

testAuth().catch(console.error);
# 테스트 실행
npx ts-node src/test-auth.ts
처음 실행하면:
1. 브라우저가 열리고 Google 로그인 화면 표시
2. 권한 동의 후 “인증 완료!” 페이지 표시
3. 터미널에 이메일 정보 출력
✅ 인증 성공!
이메일: lala2016shop@gmail.com
총 메시지 수: 15234
5. Gmail 도구 구현
이제 실제로 Gmail을 조작하는 도구들을 만든다.
Step 5-1: 이메일 목록 조회 (list_emails.ts)
src/tools/list_emails.ts:
// src/tools/list_emails.ts
// 최근 이메일 목록 조회

import { getGmailClient } from '../auth';

interface ListEmailsParams {
  maxResults?: number;  // 최대 개수 (기본: 10)
  labelIds?: string[];  // 라벨 필터 (예: ['INBOX', 'UNREAD'])
}

interface EmailSummary {
  id: string;
  threadId: string;
  snippet: string;
  from: string;
  subject: string;
  date: string;
  labels: string[];
}

export async function listEmails(params: ListEmailsParams = {}): Promise<EmailSummary[]> {
  const gmail = await getGmailClient();
  const maxResults = params.maxResults || 10;
  const labelIds = params.labelIds || ['INBOX'];

  // 메시지 목록 조회
  const response = await gmail.users.messages.list({
    userId: 'me',
    maxResults,
    labelIds,
  });

  const messages = response.data.messages || [];
  const results: EmailSummary[] = [];

  // 각 메시지 상세 정보 조회
  for (const msg of messages) {
    const detail = await gmail.users.messages.get({
      userId: 'me',
      id: msg.id!,
      format: 'metadata',
      metadataHeaders: ['From', 'Subject', 'Date'],
    });

    const headers = detail.data.payload?.headers || [];
    const getHeader = (name: string) =>
      headers.find(h => h.name === name)?.value || '';

    results.push({
      id: msg.id!,
      threadId: msg.threadId!,
      snippet: detail.data.snippet || '',
      from: getHeader('From'),
      subject: getHeader('Subject'),
      date: getHeader('Date'),
      labels: detail.data.labelIds || [],
    });
  }

  return results;
}
Step 5-2: 이메일 검색 (search_emails.ts)
src/tools/search_emails.ts:
// src/tools/search_emails.ts
// Gmail 검색 (Gmail 검색 문법 지원)

import { getGmailClient } from '../auth';

interface SearchEmailsParams {
  query: string;        // 검색어 (Gmail 검색 문법)
  maxResults?: number;  // 최대 개수 (기본: 20)
}

interface SearchResult {
  id: string;
  threadId: string;
  snippet: string;
  from: string;
  subject: string;
  date: string;
}

/**
 * Gmail 검색
 *
 * 검색 문법 예시:
 * - from:1688 → 1688에서 온 메일
 * - subject:주문 → 제목에 "주문" 포함
 * - is:unread → 읽지 않은 메일
 * - after:2024/01/01 → 2024년 1월 1일 이후
 * - has:attachment → 첨부파일 있는 메일
 */
export async function searchEmails(params: SearchEmailsParams): Promise<SearchResult[]> {
  const gmail = await getGmailClient();
  const maxResults = params.maxResults || 20;

  // 검색 실행
  const response = await gmail.users.messages.list({
    userId: 'me',
    q: params.query,
    maxResults,
  });

  const messages = response.data.messages || [];
  const results: SearchResult[] = [];

  // 각 메시지 상세 조회
  for (const msg of messages) {
    const detail = await gmail.users.messages.get({
      userId: 'me',
      id: msg.id!,
      format: 'metadata',
      metadataHeaders: ['From', 'Subject', 'Date'],
    });

    const headers = detail.data.payload?.headers || [];
    const getHeader = (name: string) =>
      headers.find(h => h.name === name)?.value || '';

    results.push({
      id: msg.id!,
      threadId: msg.threadId!,
      snippet: detail.data.snippet || '',
      from: getHeader('From'),
      subject: getHeader('Subject'),
      date: getHeader('Date'),
    });
  }

  return results;
}
Step 5-3: 이메일 내용 읽기 (read_email.ts)
src/tools/read_email.ts:
// src/tools/read_email.ts
// 이메일 전체 내용 조회

import { getGmailClient } from '../auth';

interface ReadEmailParams {
  emailId: string;  // 이메일 ID
}

interface EmailContent {
  id: string;
  threadId: string;
  from: string;
  to: string;
  subject: string;
  date: string;
  body: string;
  labels: string[];
  attachments: { filename: string; mimeType: string; size: number }[];
}

export async function readEmail(params: ReadEmailParams): Promise<EmailContent> {
  const gmail = await getGmailClient();

  const response = await gmail.users.messages.get({
    userId: 'me',
    id: params.emailId,
    format: 'full',
  });

  const message = response.data;
  const headers = message.payload?.headers || [];
  const getHeader = (name: string) =>
    headers.find(h => h.name === name)?.value || '';

  // 본문 추출 (텍스트 우선, HTML 폴백)
  let body = '';
  const parts = message.payload?.parts || [];

  // 단일 파트 메시지
  if (message.payload?.body?.data) {
    body = Buffer.from(message.payload.body.data, 'base64').toString('utf-8');
  }

  // 멀티파트 메시지
  for (const part of parts) {
    if (part.mimeType === 'text/plain' && part.body?.data) {
      body = Buffer.from(part.body.data, 'base64').toString('utf-8');
      break;
    }
    if (part.mimeType === 'text/html' && part.body?.data && !body) {
      body = Buffer.from(part.body.data, 'base64').toString('utf-8');
      // HTML 태그 제거 (간단한 버전)
      body = body.replace(/<[^>]*>/g, '');
    }
  }

  // 첨부파일 목록
  const attachments = parts
    .filter(part => part.filename && part.filename.length > 0)
    .map(part => ({
      filename: part.filename!,
      mimeType: part.mimeType || 'unknown',
      size: part.body?.size || 0,
    }));

  return {
    id: message.id!,
    threadId: message.threadId!,
    from: getHeader('From'),
    to: getHeader('To'),
    subject: getHeader('Subject'),
    date: getHeader('Date'),
    body,
    labels: message.labelIds || [],
    attachments,
  };
}
Step 5-4: 라벨 적용 (apply_label.ts)
src/tools/apply_label.ts:
// src/tools/apply_label.ts
// 이메일에 라벨 적용/제거

import { getGmailClient } from '../auth';

interface ApplyLabelParams {
  emailIds: string[];      // 대상 이메일 ID 목록
  addLabelNames?: string[];    // 추가할 라벨 이름
  removeLabelNames?: string[]; // 제거할 라벨 이름
}

interface LabelResult {
  success: boolean;
  modifiedCount: number;
  errors: string[];
}

/**
 * 라벨 이름으로 라벨 ID 찾기 (없으면 생성)
 */
async function getLabelId(gmail: any, labelName: string): Promise<string> {
  // 기존 라벨 목록 조회
  const labelsResponse = await gmail.users.labels.list({ userId: 'me' });
  const labels = labelsResponse.data.labels || [];

  const existing = labels.find(
    (l: any) => l.name.toLowerCase() === labelName.toLowerCase()
  );

  if (existing) {
    return existing.id;
  }

  // 라벨 생성
  const newLabel = await gmail.users.labels.create({
    userId: 'me',
    requestBody: {
      name: labelName,
      labelListVisibility: 'labelShow',
      messageListVisibility: 'show',
    },
  });

  console.log(`새 라벨 생성: ${labelName}`);
  return newLabel.data.id!;
}

export async function applyLabel(params: ApplyLabelParams): Promise<LabelResult> {
  const gmail = await getGmailClient();
  const errors: string[] = [];
  let modifiedCount = 0;

  // 라벨 이름 → ID 변환
  const addLabelIds: string[] = [];
  const removeLabelIds: string[] = [];

  for (const name of params.addLabelNames || []) {
    try {
      addLabelIds.push(await getLabelId(gmail, name));
    } catch (err: any) {
      errors.push(`라벨 '${name}' 처리 실패: ${err.message}`);
    }
  }

  for (const name of params.removeLabelNames || []) {
    try {
      removeLabelIds.push(await getLabelId(gmail, name));
    } catch (err: any) {
      errors.push(`라벨 '${name}' 처리 실패: ${err.message}`);
    }
  }

  // 각 이메일에 라벨 적용
  for (const emailId of params.emailIds) {
    try {
      await gmail.users.messages.modify({
        userId: 'me',
        id: emailId,
        requestBody: {
          addLabelIds,
          removeLabelIds,
        },
      });
      modifiedCount++;
    } catch (err: any) {
      errors.push(`이메일 ${emailId} 수정 실패: ${err.message}`);
    }
  }

  return {
    success: errors.length === 0,
    modifiedCount,
    errors,
  };
}
Step 5-5: 필터 생성 (create_filter.ts)
src/tools/create_filter.ts:
// src/tools/create_filter.ts
// Gmail 자동 필터 생성

import { getGmailClient } from '../auth';

interface CreateFilterParams {
  from?: string;        // 발신자 필터
  to?: string;          // 수신자 필터
  subject?: string;     // 제목 필터
  query?: string;       // 자유 검색어
  addLabelName?: string;    // 적용할 라벨
  markAsRead?: boolean;     // 읽음 처리
  archive?: boolean;        // 아카이브
  star?: boolean;           // 별표
}

interface FilterResult {
  success: boolean;
  filterId?: string;
  error?: string;
}

export async function createFilter(params: CreateFilterParams): Promise<FilterResult> {
  const gmail = await getGmailClient();

  try {
    // 라벨 ID 조회/생성
    let labelId: string | undefined;
    if (params.addLabelName) {
      const labelsResponse = await gmail.users.labels.list({ userId: 'me' });
      const labels = labelsResponse.data.labels || [];

      let label = labels.find(
        (l: any) => l.name.toLowerCase() === params.addLabelName!.toLowerCase()
      );

      if (!label) {
        const newLabel = await gmail.users.labels.create({
          userId: 'me',
          requestBody: {
            name: params.addLabelName,
            labelListVisibility: 'labelShow',
            messageListVisibility: 'show',
          },
        });
        label = newLabel.data;
      }

      labelId = label.id;
    }

    // 필터 조건 구성
    const criteria: any = {};
    if (params.from) criteria.from = params.from;
    if (params.to) criteria.to = params.to;
    if (params.subject) criteria.subject = params.subject;
    if (params.query) criteria.query = params.query;

    // 필터 액션 구성
    const action: any = {};
    if (labelId) action.addLabelIds = [labelId];
    if (params.markAsRead) action.removeLabelIds = ['UNREAD'];
    if (params.archive) action.removeLabelIds = [...(action.removeLabelIds || []), 'INBOX'];
    if (params.star) action.addLabelIds = [...(action.addLabelIds || []), 'STARRED'];

    // 필터 생성
    const response = await gmail.users.settings.filters.create({
      userId: 'me',
      requestBody: {
        criteria,
        action,
      },
    });

    return {
      success: true,
      filterId: response.data.id,
    };
  } catch (err: any) {
    return {
      success: false,
      error: err.message,
    };
  }
}
6. MCP 서버 완성
이제 모든 도구를 MCP 서버로 묶는다.
Step 6-1: index.ts 작성
src/index.ts:
// src/index.ts
// Gmail Agent MCP Server

import { Server } from '@modelcontextprotocol/sdk/server/index.js';
import { StdioServerTransport } from '@modelcontextprotocol/sdk/server/stdio.js';
import {
  CallToolRequestSchema,
  ListToolsRequestSchema,
} from '@modelcontextprotocol/sdk/types.js';

import { listEmails } from './tools/list_emails';
import { searchEmails } from './tools/search_emails';
import { readEmail } from './tools/read_email';
import { applyLabel } from './tools/apply_label';
import { createFilter } from './tools/create_filter';

// MCP 서버 생성
const server = new Server(
  {
    name: 'gmail-agent',
    version: '1.0.0',
  },
  {
    capabilities: {
      tools: {},
    },
  }
);

// 도구 목록 정의
server.setRequestHandler(ListToolsRequestSchema, async () => {
  return {
    tools: [
      {
        name: 'list_emails',
        description: '최근 이메일 목록을 조회합니다. 라벨로 필터링 가능.',
        inputSchema: {
          type: 'object',
          properties: {
            maxResults: {
              type: 'number',
              description: '조회할 이메일 수 (기본: 10, 최대: 50)',
            },
            labelIds: {
              type: 'array',
              items: { type: 'string' },
              description: '필터링할 라벨 ID (예: ["INBOX", "UNREAD"])',
            },
          },
        },
      },
      {
        name: 'search_emails',
        description: 'Gmail 검색 문법으로 이메일을 검색합니다.',
        inputSchema: {
          type: 'object',
          properties: {
            query: {
              type: 'string',
              description: '검색어 (예: "from:1688", "subject:주문", "is:unread")',
            },
            maxResults: {
              type: 'number',
              description: '조회할 이메일 수 (기본: 20)',
            },
          },
          required: ['query'],
        },
      },
      {
        name: 'read_email',
        description: '특정 이메일의 전체 내용을 읽습니다.',
        inputSchema: {
          type: 'object',
          properties: {
            emailId: {
              type: 'string',
              description: '이메일 ID',
            },
          },
          required: ['emailId'],
        },
      },
      {
        name: 'apply_label',
        description: '이메일에 라벨을 추가하거나 제거합니다. 라벨이 없으면 자동 생성.',
        inputSchema: {
          type: 'object',
          properties: {
            emailIds: {
              type: 'array',
              items: { type: 'string' },
              description: '대상 이메일 ID 목록',
            },
            addLabelNames: {
              type: 'array',
              items: { type: 'string' },
              description: '추가할 라벨 이름 (예: ["소싱", "긴급"])',
            },
            removeLabelNames: {
              type: 'array',
              items: { type: 'string' },
              description: '제거할 라벨 이름',
            },
          },
          required: ['emailIds'],
        },
      },
      {
        name: 'create_filter',
        description: 'Gmail 자동 필터를 생성합니다. 특정 조건의 이메일에 자동으로 라벨/아카이브/읽음 처리.',
        inputSchema: {
          type: 'object',
          properties: {
            from: {
              type: 'string',
              description: '발신자 필터 (예: "1688.com")',
            },
            to: {
              type: 'string',
              description: '수신자 필터',
            },
            subject: {
              type: 'string',
              description: '제목 필터',
            },
            query: {
              type: 'string',
              description: '자유 검색어',
            },
            addLabelName: {
              type: 'string',
              description: '적용할 라벨 이름',
            },
            markAsRead: {
              type: 'boolean',
              description: '자동 읽음 처리',
            },
            archive: {
              type: 'boolean',
              description: '자동 아카이브',
            },
            star: {
              type: 'boolean',
              description: '자동 별표',
            },
          },
        },
      },
    ],
  };
});

// 도구 실행 핸들러
server.setRequestHandler(CallToolRequestSchema, async (request) => {
  const { name, arguments: args } = request.params;

  try {
    let result: any;

    switch (name) {
      case 'list_emails':
        result = await listEmails(args as any);
        break;
      case 'search_emails':
        result = await searchEmails(args as any);
        break;
      case 'read_email':
        result = await readEmail(args as any);
        break;
      case 'apply_label':
        result = await applyLabel(args as any);
        break;
      case 'create_filter':
        result = await createFilter(args as any);
        break;
      default:
        throw new Error(`Unknown tool: ${name}`);
    }

    return {
      content: [
        {
          type: 'text',
          text: JSON.stringify(result, null, 2),
        },
      ],
    };
  } catch (error: any) {
    return {
      content: [
        {
          type: 'text',
          text: `오류 발생: ${error.message}`,
        },
      ],
      isError: true,
    };
  }
});

// 서버 시작
async function main() {
  const transport = new StdioServerTransport();
  await server.connect(transport);
  console.error('Gmail Agent MCP Server 시작됨');
}

main().catch(console.error);
Step 6-2: 빌드 및 테스트
# 빌드
npx tsc

# 테스트 실행
node dist/index.js
7. Claude Code 연동
Step 7-1: MCP 설정 파일 수정
~/.mcp.json 파일 열기:
# 설정 파일 열기 (없으면 생성)
code ~/.mcp.json
gmail-agent 서버 추가:
{
  "mcpServers": {
    "gmail-agent": {
      "command": "node",
      "args": ["/Users/사용자명/gmail-agent-mcp/dist/index.js"]
    }
  }
}
⚠️ 경로를 본인 환경에 맞게 수정하세요!
Step 7-2: Claude Code 재시작
# Claude Code 재시작
claude

# 또는 기존 세션에서
/mcp
MCP 서버 목록에 gmail-agent가 보이면 성공!
8. 실전 사용 예시
예시 1: 최근 이메일 확인
나: 오늘 온 읽지 않은 이메일 보여줘

Claude: [list_emails 실행]
        읽지 않은 이메일 5개:
        1. [1688] 주문 발송 안내 - 10:23
        2. [Cafe24] 신규 주문 알림 - 09:45
        3. ...
예시 2: 특정 발신자 검색
나: 1688에서 온 이메일 중에 "발송"이 포함된 것만 찾아줘

Claude: [search_emails 실행 - query: "from:1688 subject:발송"]
        검색 결과 3개:
        1. 주문번호 xxx 발송완료 - 3월 28일
        2. ...
예시 3: 라벨 일괄 적용
나: 방금 검색한 3개 이메일에 "배송완료" 라벨 붙여줘

Claude: [apply_label 실행]
        ✅ 3개 이메일에 "배송완료" 라벨 적용 완료
        (라벨이 없어서 새로 생성했습니다)
예시 4: 자동 필터 설정
나: 앞으로 1688에서 오는 이메일은 자동으로 "소싱" 라벨 붙이고 읽음 처리해줘

Claude: [create_filter 실행]
        ✅ Gmail 필터 생성 완료
        - 조건: from:1688
        - 액션: "소싱" 라벨 적용, 읽음 처리
9. 트러블슈팅
문제: “credentials.json 파일이 없습니다”
해결: Google Cloud Console에서 OAuth 클라이언트 ID를 다시 다운로드하고
      프로젝트 루트에 credentials.json으로 저장
문제: “인증 토큰이 만료되었습니다”
해결: token.json 삭제 후 다시 실행
      rm token.json
      npx ts-node src/test-auth.ts
문제: “Access Denied” 에러
해결:
1. Google Cloud Console > OAuth 동의 화면 > 테스트 사용자에 본인 이메일 추가
2. 범위(Scopes)가 올바르게 설정되었는지 확인
문제: MCP 서버가 인식 안 됨
해결:
1. ~/.mcp.json 경로가 정확한지 확인
2. node dist/index.js가 에러 없이 실행되는지 확인
3. Claude Code 완전 재시작 (터미널 새로 열기)
마무리
1시간이면 만드는 이메일 에이전트.
솔직히 말하면, TypeScript도 MCP도 처음이었다. Google Cloud Console에서 OAuth 설정할 때는 “이걸 내가 할 수 있나?” 싶었다. 근데 Claude한테 물어보면서 하나씩 해결하다 보니 어느새 돌아가고 있었다.
50대 아빠가 TypeScript로 MCP 서버를 만들었다. 이게 되는 시대다.
만든 것:
– Gmail API OAuth 인증
– 이메일 목록/검색/읽기
– 라벨 자동 적용
– 필터 자동 생성
다음에 해볼 것:
– 이메일 요약 기능 (Claude가 내용 분석)
– 자동 답장 초안 작성
– 주간 이메일 리포트 생성
늦게 시작해도 괜찮다. 이제는 혼자가 아니니까.
— 늦깎이연구소, 2026.04 —
Bloom late, but stronger.